Wildcats!

DSC03458Hey everybody, it’s been a while 🙂 sorryi’mnotsorry. The gorgeous summer has left us and I’m feeling a little blue about the next 9 months of rain. Oregon weather is such a tease (9 months of shit in exchange for the most beautiful/perfect summers you’ve ever seen). Enough talking about the weather, let’s talk about my latest dress.

This is version one billion of Dixie DIY’s Ballet Dress Pattern. It is such a good versatile basic. The fabric is a cozy leopard print sweater knit I picked up at Joann’s recently. I bought the last of the bolt so I only 1.35 yards to work with. It wasn’t a challenge to fit this in with the limited yardage. I cut the fronts and backs on the fold, and then had to lay it out as a single layer to fit in the sleeves. This fabric went from flat yardage to a completed dress in 2 and a half hours. Is there a sewing equivalent to fast fashion? That’s about as close to instant gratification as a trip to Target.

I modified the bodice by keeping the 3 inches in length that I added last time. The sleeves were narrowed about 2 inches to be a closer fit than the pattern is drafted. I think I will narrow the shoulder seam the next time I make this dress. I’ve sewn a few things since I last posted. I made a blouse for my sister a cute lacy pair of the Iris shorts by Colette, some more funny underpants, and a wool cap. For the most part I’ve felt underwhelmed. I’m going to try to make something a little more challenging to pique my interest in sewing again.

xx, Cynthia

20131009-213015.jpg20131009-213100.jpg

Junk Food Nation

IMG_20130812_191749_975While I was making this dress I realized I should concentrate my fabric buying on solid pieces of fabric because that’s what I tend to pull most out of my closet. Of course that’s what I realized while making a party dress out of the silliest fabric ever made. In my head, I thought this would be a fun flirty dress, which it is, but it’s also very bold. I don’t know how much I’ll wear this. Note to self: Don’t buy fabric because it makes you laugh.

This is Vogue 1288. I’m surprised I haven’t seen more of this dress made up because it’s super cute and super easy. I like the low sexy back and this is loose and comfortable to wear in the summertime heat. This honestly took maybe three hours to make.

IMG_20130812_191906_831The instructions tell you to make a metric shit ton of bias binding and bind all of the seams. I ignored those, perhaps that would be necessary with a sequinned fabric, but not with the soft rayon challis I used. I just serged them all. The neckline and armholes are bound with bias. It’s a very neat and clean finish.

IMG_20130812_191833_581I made a straight size 12 and really should have graded out to a 14 in the hips/ thigh area. This skirt is tight on my… errrr… “strong” legs. I’m going to call this dress a wearable muslin instead of the finished dress I had in mind. I really do love the sillhouette and I really do love pizza, but maybe not together

Hawthorn

DSC03311 So I really wanted to trek it to Hawthorn Ave to take pictures of my Hawthorn dress, that seemed so meta to me. However, the mister was hungry so that didn’t happen… boo. I love this dress so much!!! I hope I didn’t go too cutesy with the heart shaped buttons for a grown-ass woman. Essentially if I’m left to my own devices I dress myself like a toddler. True story: at the library on Saturday a baby laughed at me for wearing the same shoes as her. In fact the same shoes I’m wearing in these photos #grownupfetus

DSC03320This dress is beautifully drafted. and much more fitted than previous Colette’s. I did absolutely no adjustments to the size/ fit. This is a straight size 4 and fits pretty darn perfect. I know a lot of petite women struggle with Colette’s because they are drafted for a bustier figure than most commercial patterns. The fit is intended for a C cup in case you didn’t know. If you’re a curvier lady though, this should fit great!

DSC03322This fabric came from the Pendleton Woolen Mill. They are having their summer clearance sale and all of their 100% cotton fabric is only $2.50 a yard. So awesome! They just sell off the remaining fabric from their clothing line and it’s supah nice. Almost all of the cotton is plaid shirting, except for this lavender oxford shirting I picked up. If you’re in the Portland, OR area I recommend checking them out.

DSC03305I found these buttons at the Button Emporium. Man that place is a trip! I was really torn between these white hearts and some purple elephant buttons they had. Or maybe I should have gone with wizards and dragons.  or Virgin Mary buttons? The options are endless there. I went with the hearts because that was my original vision.

DSC03312I sewed this according to the directions except for the collar and pockets. I read in the Flickr group that if you sew the collar with 5/8″ seam allowance it comes out too small, so I stitched it at 1/4″. I also drafted these big ass patch pockets. I knew I wanted pockets but I didn’t want to add side seam pockets which would add bulk to the skirt and affect how it hangs. These are inspired by the shape of the pockets on jeans. I took photos of my process, to write a post showing you how to make them. Soon guys… soon.

DSC03302The guts of this dress are serged and this is a nice well made dress that I’m kind if in love with. The way this moves with me when I walk is perfection. Bravo Sarai! This is my favorite Colette pattern so far.

DSC03331

Ballet Dress Redux

DSC03296This is my second version of Dixie DIY’s Ballet Dress Pattern (here is my first). I used some really luxe feeling fabric I found in the jersey table in the flat fold annex (ie the cheap stuff) at Mill End. Usually the jersey they have is of the not very stretchy, tissue thin, pilly variety. This jersey feels quite spongy to the touch and is very soft and stretchy. I think this must be some sort of rayon/ lycra blend.

DSC03273I added 3 inches to the bodice length. This now fits me at my natural waist and doesn’t have an empire waist look to it. I also cut a small instead of a medium and it fits just right now. On a side note Dixie, changed her pattern recently to be 2 inches longer in the waist. I made this one sleeveless (summer summer summertime, yo), and my favorite modification is the lace neckline.

DSC03271This lace came from a *very* loved t-shirt I bought at Urban Outfitter about 4 or 5 years ago. It had definitely seen better days. It had yellow underarms and holes– the works. It was time to say goodbye. I carefully cut it off of that grody old t-shirt and edge stitched it on using a normal straight stitch. Then I used my small embroidery scissors to cut the  jersey away from the lace on the wrong side. There is a little bit of skin peak-a-boo through the lace. This would be a very easy way to fancy up any simple tee or dress.

DSC03290I constructed the entire dress (except for the lace) on my serger. This was the first time I was able to do that. Man was that fast and easy!  The tension was never right and it would pull apart, so I only used it to finish seams before. I took it to Modern Domestic to be serviced and she purrs like a kitten now. I highly recommend them, they even let you use their fancy pants machines in their studio while yours is being serviced. Since this was my first time using my serger to construct I went a little too fast and my waist seams don’t quite match. I decided to make a long sash/ belt to tie around my waist to hide it. Design flaw or design feature?

DSC03287My stripes match in the bodice, but I didn’t have enough fabric to make them match in the skirt as well. I was able to match the first group of stripe in the skirt, but that was it. Whatevs, NBD… amirite?!?!?

DSC03297Byeeeeeeeeeeee!!! xx, Cynthia


Poppin’ Tags

DSC03240I picked up this dress a couple of weeks ago at the Goodwill bins for like 75 cents (they had a broken keyboard, I bought a broken keyboard… HOLLA). I’m a sucker for old fashioned lace embellishments and I thought I could make something cute out of this. The care label said it was 100% rayon, so I decided it was worth my time to resurrect this.

photoI didn’t do anything much to save this dress. It just goes to show how little tweaks can totally change the look of a garment. I really like how this came out. I think it looks very Modcloth/ Shabby Apple-esque now.

DSC03242I hacked about a foot off of the length. I also cut out the HUGE shoulder pads and used my seam ripper to remove the sleeves. I made two little darts right at the underarms to bring it a little bit closer to my body to conceal my bra. Then I turned and stitched around the armscye. I also stitched up a new hem. That’s all.  I hope this inspires you to try to make something old new again. I threw in this last photo because it made me laugh, I’m like, “no more paparazzi”

DSC03254xx, Cynthia

Simplicity 2250

DSC03221The fabric for this dress came compliments of Organic Cotton Plus. They sent me an email asking me if I’d be interested in some fabric of my choice in exchange for my review. I was very flattered, and obvoiusly said yes, because here I am reviewing it. I chose the pale aqua sateen. The color shown on their website looked sort of gray, but in reality it’s an icy Tiffany blue. It has a very subtle sheen so it can be dresssed up or down.

DSC03233They sent me 2 yards and that was way more then enough to make this dress. The fabric is 110″ wide, so it felt a bit awkward cutting it out. This fabric reminded me a lot of nice bed linens to be honest. I ended up moving to the floor because the fabric was too large for my dining room table.

DSC03229This fabric is is sort of medium bodied so I thought it would hold up the structure that this design requires. The bodice is self lined and also self underlined.  This pattern has sort of a bad reputation on sewing pattern review, the main problem mentioned by reviewers is that the bodice lining is too short. I added an inch to all of my lining/ underlining pieces and then trimmed the lining down to match the bodice length. This seemed to fix the problem.

DSC03235When you make this dress you need to make sure that you follow the directions *exactly*. The pleats and folds that make the draped look of the bodice do not go together intuitively. I went ahead of the directions and ended up having to go back and rip out stitches. If you take your time and follow the directions and diagrams, this dress is no more difficult than any other style of bodice.

DSC03234I did a machine blind hem to finish this and inserted a lapped zipper. I had to insert this zipper three times. Holy moly!?!?! This first time I didn’t refer to any resources and tried to go by memory. It looked awful! The second zipper, I used Sunni’s free zipper class on Craftsy. That zipper looked perfect. When I went to use it the first time that zipper failed. Ughhh! Then I looked in my stash and found this last zipper which was a better color match anyways. I decided to machine the zipper to the under part, and hand-pick the overlap. There was one thing I didn’t like about this fabric. It’s so tightly woven that it shows needle holes and they don’t steam out. I hand-picked to minimize damage, in case I’d  have to do it a fourth time.Note to self: I used a universal needle. In the future I’ll make sure to use a sharps needle with this fabric. That should lessen the puncture holes.

DSC03219I don’t think anyone should be afraid of this pattern. It has such cute details. This organic cotton was the perfect match for the pattern. I recommend checking out Organic Cotton Plus if ethical fabric is important to you. It really is a quality fabric. I plan on using the rest that I have to underline a pair of lace shorts.

xx, Cynthia

Brave 3.0 I Bombshell Edition

DSC03183I hope you’re not sick of swimsuits by now, because here’s another. So by now it seams that everybody has made or is making the Bombshell Swimsuit. If you haven’t yet, you should probably get on that because all the cool girls are. Every version I see makes me squeal about what a bunch of hot babes us sewing/bloggy ladies are. It is universally flattering.

When I saw that one of views was a high-waisted bikini bottom, I knew I needed to make a version for myself. I found the red gingham swimsuit fabric from Mill End. I think this make a cute Maryanne from Gilligan’s Island style bikini. I actually forget to cut one of the pieces out and when I tried to fit it onto my remaining fabric I didn’t have enough. I told the mister on the phone and was pretty dramatic about it. He picked some more fabric while he was out because he’s sweet on me, and now I have enough to make another bikini :).

DSC03188The top is one of the views of McCall’s 5400.This is turning into quite a versatile pattern. It has so many options that it’s a good one to pick up at the next 99 cent sale. This top feels very secure to wear while swimming. I typically buy only halter style swim tops anyways in RTW so it makes sense for me to finally make one. When it came time to stitch the swim hook and make the loop on the back of the suit the fabric was much too thick for the stretch needle I was using. I was trying to sew through 2 layers of elastic and 4 layers of fabric at that point. I switched to a top-stitching needle and that did the trick.

DSC03186Now onto the bottom. I made a size 8 at the waist tapering out to a size 10 at my hips. This suit used up and entire spool of thread, in between all of the basting and I zig-zagged my raw edges since my serger isn’t back from repair yet. Holy Moly that’s a lot of thread! When you make this just be prepared to do quite a bit of unpicking along the ruching. Also, don’t think you’re smarter than the directions. I kept going on ahead and then having to back up and unpick bits (maybe that’s why I used so much thread… LOLLZZZZ). The way Heather has you put this together is quite clever, in particular the elastic around the legs  and how it continues on into hemming the skirt. Clever, clever, clever…. it almost felt like origami.

DSC03191I was able to finish this the morning of July 4th and wear it all day on a daytime drinking/ river floating extravaganza. I felt like a babe, and this didn’t fall apart or expose me when I took a tumble over some rapids.

xx, Cynthia

Brave 2.0

DSC03133 I made another bikini ya’ll! And I have at least two more bathing suits planned so I hope you don’t get bored. I love swimming so much. Maybe it’s because I’m a pisces or maybe because it’s the most fun thing in the world? This one is made from McCall’s 5400. I made the lower cut panty (view F) and adjusted the tankini pattern (view E) into a bikini top.

I used some remnant swimsuit fabric purchased in the flat fold annex at the Mill End, my local fabric store is rad and like half a mile from my house (dangerous). I made a size 12 up top, and got honest with myself about my size and made a 14 on the bottom. This suit doesn’t do the nasty muffin-top-squishing-in-my-soft-bits that my last me-made suit does.

DSC03145My serger is still in the shop getting worked on (I really busted it trying to “fix” it). This was made entirely on my sewing machine. Don’t be scared to make swimsuits if you don’t have a serger. It’s not necessary to make a secure, stretchy, comfortable swimsuit.

If you’d like to make this pattern for yourself, there are a couple of things to watch out for. The elastic guide that they give you is far too big. Just toss out those pieces and go by feel. On the front of the leg openings I didn’t stretch the elastic out at all, but you want to pull it fairly tight starting around your crotch and around your booty. You don’t want to flash your beaver at the pool when this gets wet, do you? Also the low cut panty is practically pube low, so keep that in mind depending on how modest you are.

DSC03164To make the top into a bikini I had to make a back piece for the cups provided for the tankini top. For the size 12 I made a rectangle that measured 14.5 inches and was the same width as the bust piece. For extra support I inserted small pieces of boning into the side seam allowances. I also disregarded the directions by inserting elastic along the top of the bust piece. They don’t have you do that and it didn’t seem secure enough to me. I also inserted swim cups that I harvested out of an older swimsuit that has seen better days. This top is essentially a bandeau top, much like the suit I just made but it feels much more secure and supportive. The halter strap helps a lot!

DSC03169I wore this yesterday to float the river. We drove upriver a few miles and rode the current back to my apartment. We even took the dogs (one of our tubes has a mesh bottom). Bacon looks so cute in his life jacket! The poor guy just sinks when he tries to swim #bulldogproblems.  If you follow me on Instagram (my username is Cynbular) You may have seen that my sweet Spanky had to have an emergency surgery on his eye. We were able to remove the sutures and the dreaded “cone of shame” on Thursday and he’s feeling and doing much better as you can see how handsome he is in this photo.

xx, Cynthia

Brave

3B25F4AD-4D67-45F0-89C7-E8A5C28F10C3-12201-000009FDA7911A8F I wasn’t sure about taking photos in my homemade bathing suit, that I posted a photo of about a month ago. I knew I was over-due to post a pattern review and details, but I decided to be brave and post photos in the suit as well. You can’t really tell what something looks like, when it’s not on a body. I’m even going to show you the backside (yikes!) Ladies, we’ve got  to start loving the skin we’re in… amirite?

This was made using Kwik Sew 3875. Ya’ll, I think I’m hooked on making my own swimwear from now on. You can pick whatever fabrics you want, you use so little it’s super economical (this only required 3/4 yard), you get to make your dream suit, and it’s actually pretty easy. Who knew? I already have the fabric bought to make another bikini, and I’m totally going to make the Bombshell Suit. Hmmm…. I also want a bikini with a high-waisted bottom and halter-top. I’m getting excited. I’m sure you’ve noticed the river in the background of my blog photos recently. It’s out my back door, is this  real life? After work today, my husband and I hopped into our inner tubes and floated while drinking beers. This summer is gonna be my jam, and I need MOAR bathing suits! Squeeee.

D28AD219-2A9F-4B20-B0D6-45FB94A60028-12201-000009FDF7C4FF74
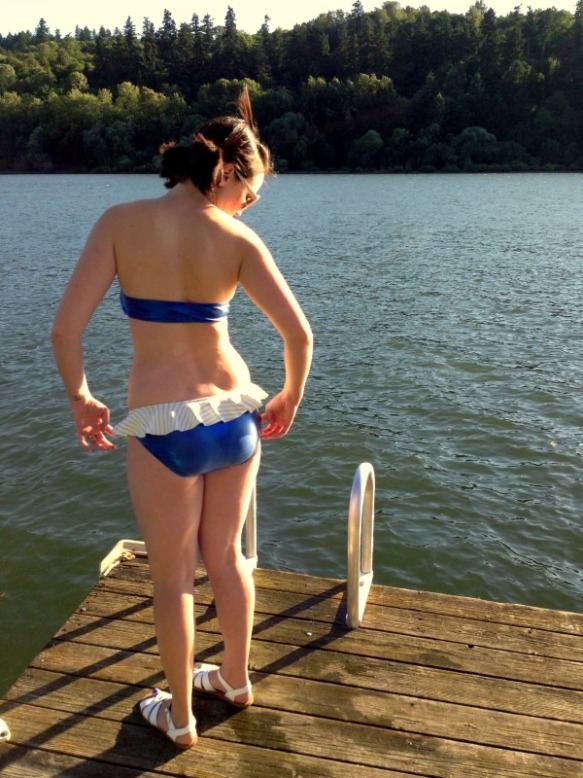
Now that I got that out if the way, I can talk about this swimsuit. Since this is my first attempt there are definitely a few things I would like to do differently next time, but I’m pretty pleased with the final outcome. I found this fabric locally. The metallic blue wasn’t actually with the swimwear fabric. I think it’s intended for “dance” costumes (hopefully that doesn’t bring all of the google creeps to my blog… shudder). It has the right amount of stretch, but it’s already starting to lose it’s shine on high stress areas (mainly my booty). I also found this white fabric with a thin gold stripe (I wish I had bought more, because they’ve sold out of it and I really love it). I really liked the way they looked together. My grandpa was in the Navy, so I think it’s in my DNA to like nautical fashion.

1449C1B9-C0E8-43A0-9C35-5CB16E399DD5-12201-000009FD907A9C92Besides the swimwear fabric, making this suit required a few different supplies than I normally use. It is lined with a flesh colored spandex lining, it used 3/4 inch “cotton elastic”, and there are two pieces of boning along the sides of the bust for support. I wish I added bra cups. I might add a halter strap still.

I had to experiment, but I found using my walking foot to be invaluable in helping this sticky/grabby fabric feed through my sewing machine. I used two different types of stretch stitches. I used a triple straight stitch for all of the seams and any top-stitching. I also used a triple zig-zag stitch to attach the elastic to the suit. You should of course experiment on your machine, but I found those two stitches to have the most elasticity to them.

22C2722D-FF69-45F4-AFAD-37F6AD9B7426-12201-000009FFE4BB021DThe pattern directions that came with the pattern were excellent, and I also found the swimsuit sew-a-long posts from Dixie DIY (I’m starting to sound like a weird fan girl over here) to be very helpful. I made a size small on the top and bottom, but I will make a medium bottom in the future. As is, this bikini does the dreaded muffin top bulge over (note how my hand is on my hip in these photos artfully hiding that part). I was pleasantly surprised by the low cut bottom, so many sewing patterns come out a bit matronly.

This suit has already been in hot springs, a hot tub, a  pool and the river and has held up fine with no wardrobe malfunctions. I have had concerns about the top not being supportive enough,  just the nature of bandeau tops. I can happily report that the top received it’s greatest test yet when the mister pushed me in when we were done taking picture. Everything stayed where it was supposed to! No nip slips… YAY!

B5FBE0D7-5FC5-4DF3-8877-F28D1FB2A031-12201-00000A014915E331
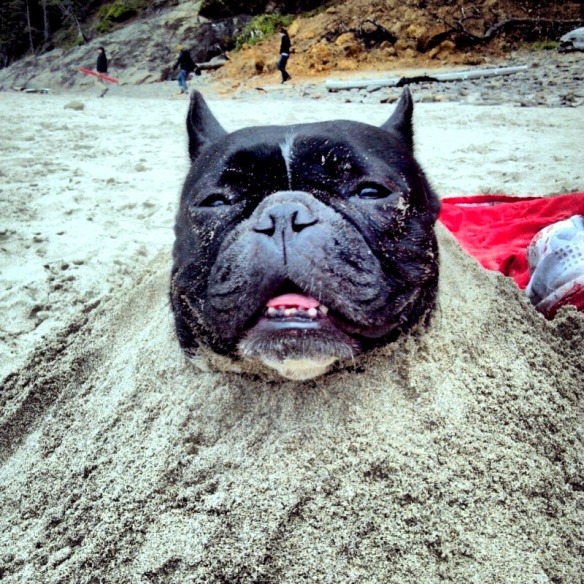
I also wanted to show you the new sandals I got today. Saltwater’s, I think they’re cute even if they’re baby shoes. They’ll be perfect for my vacation I’m going on next week. Also, Bacon let me bury him in the sand last week. He’s too funny, I love that ugly mug so much! Also, I broke my serger (#sadface). Hopefully it can be fixed, I dropped it off at Modern Domestic. Sorry if this post is a bit manic, I’m over-caffeinated and under-fed at the moment. A dangerous combo

xx, Cynthia


Dixie DIY: Ballet Dress

DSC03112Wow guys… two makes in one weekend. I think that’s a record for me. I’ve been so busy having fun every weekend that I really wanted to chill out and spend some QT with my sewing machine. I made this sweet little knit dress using the Dixie DIY Ballet Dress Pattern. I really love this dress. It’s comfortable, skims the body enough to show you’re a lady, and easy to make.

I was going to add a skirt to my Maria Denmark t-shirt pattern, but then felt lazy. Dixie already did the work for me, it’s only $4, and (this is really why I didn’t buy this pattern sooner) Etsy now allows *instant* PDF downloads. Also I wanted to help a sistah out.

DSC03115I cut a size medium, but ended up taking the side seams quite a bit. Next time (and there will be a next time), I’m going to start with a size small and go from there. I didn’t make an changes to the pattern, other than shortening the sleeves. I really wanted to see how this was going to fit and wear before I started going crazy with the one billion hacks and variations I’ve got swimming in my brain.

I need to add about one inch to the front bodice piece. It pulls up on account of my bosom. It almost feels like an empire waist dress. Marie had the same issue when she made the dress, so I’m going to assume this would be a needed adjustment for somebody with a full C-D cup bra size. Also the sleeves are pretty loosey goosey. When I make  a long sleeved  version I’m going to slim them down quite a bit.

DSC03121I love the drape of the skirt. It flares out in the most flattering way and moves and swishes with you as you walk. This photo isn’t the greatest but it shows how it skims, but doesn’t cling to my figure problem area, known affectionately in my house as my pizza pouch. I eat the shit out of pizzzzzzzzzzaaaaaaa.

DSC03123I changed the order of construction, because I like to work flat with knits as much as possible. I work in a production studio for a knitwear line so I can do this in my sleep. If you’re interested here is my usual order of construction:

(1) Sew shoulder seams, apply twill tape for stability. (2) Sew sleeves to shoulders. (3) Attach elastic to the top edge of the skirt pieces on the wrong side. Be careful to not stretch out the elastic. I used my walking foot. (4) Sew skirt pieces to both the bodice front and back (5) Sew the side seam in one long continuous seam, matching the underarms and waist. I like to start at the sleeve hems because I get to the match points sooner. (6) Apply the neck band (7) Hem, I used my twin needle for this.

xx, Cynthia